
How to Delete Emails in Bulk in Gmail: 2025 Guide
How to Delete Emails in Bulk in Gmail: Easy 2025 Guide
Is your Gmail inbox overflowing with unread messages, spam, and outdated subscriptions? Managing thousands of emails can feel overwhelming, especially when you’re hit with the dreaded “low storage” warning. Fortunately, Gmail offers powerful tools to delete emails in bulk, helping you reclaim your inbox and free up space quickly. This comprehensive guide, updated for 2025, walks you through multiple methods to mass delete emails in Gmail, whether you’re targeting specific categories, senders, or all messages. Say goodbye to inbox clutter and restore order with these simple, effective techniques.
From promotional emails to forgotten newsletters, Gmail’s intuitive features make it easy to organize your inbox without spending hours sorting through messages. Whether you’re a busy professional, a student, or simply tired of a chaotic inbox, these methods will help you efficiently clear out unwanted emails and optimize your Gmail storage. Let’s dive into the step-by-step processes to streamline your email management and keep your inbox clutter-free.
Also Read: How to Boost Windows 11 Battery Life in 2025
Why You Should Delete Emails in Bulk
A cluttered Gmail inbox not only makes it harder to find important messages but can also lead to storage issues. Google provides 15GB of free storage shared across Gmail, Drive, and Photos, and excessive emails can quickly eat into this limit. By deleting emails in bulk, you can free up valuable space, improve inbox organization, and enhance your email experience. Regularly clearing out spam, promotions, and outdated messages ensures your inbox remains manageable and efficient, saving you time and frustration in the long run.
Gmail’s bulk deletion tools are designed to handle large volumes of emails, allowing you to target specific types of messages or clear entire folders with ease. Whether you’re dealing with thousands of unread emails or want to eliminate messages from a specific sender, Gmail’s flexible options make the process straightforward. Let’s explore the various methods to mass delete emails and regain control of your inbox.
Method 1: Mass Delete Emails from Your Gmail Inbox
The simplest way to delete emails in bulk in Gmail is through the inbox’s built-in selection tool. Follow these steps to clear out your inbox quickly:
- Log into Gmail: Open your Gmail account and navigate to the Inbox folder.
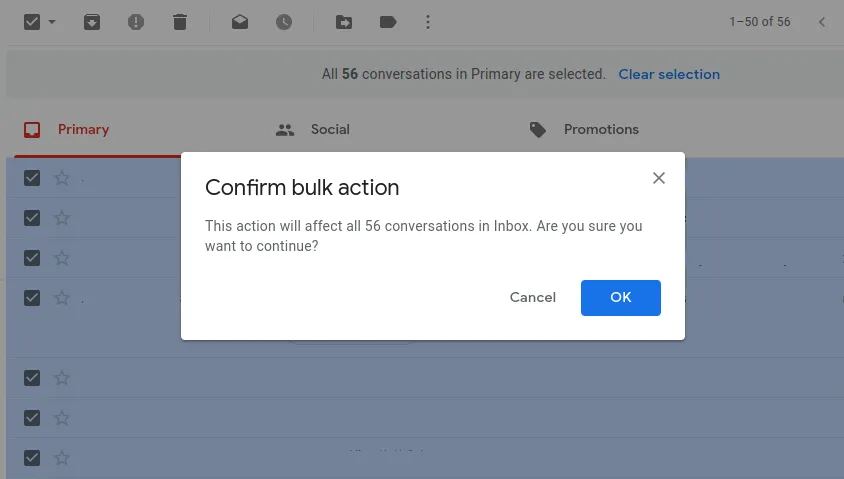
- Select Emails: Click the square checkbox in the top toolbar to select all visible emails (up to 50 or 100, depending on your view settings).
- Select All Conversations: A blue notification will appear, offering to “Select all X conversations in Inbox.” Click this link to select every email in the folder.
- Delete Emails: Click the trash icon in the toolbar to move the selected emails to the Trash folder.
- Confirm Deletion: Confirm the action to complete the bulk deletion process.
Note that deleted emails are moved to the Trash folder, where they remain for 30 days before being permanently deleted. To free up space immediately, navigate to the Trash folder, select all emails, and click “Delete Forever.” This method works for any Gmail folder, not just the inbox, making it versatile for clearing out various sections of your account.
Method 2: Delete Emails by Category
Gmail’s category tabs (Primary, Social, Promotions, Updates, and Forums) make it easy to target specific types of emails for bulk deletion. Here’s how to delete emails by category:
- Access Categories: In the left sidebar, click “Categories” to view options like Social, Promotions, or Updates.
- Choose a Category: Select the category you want to clear, such as Promotions for marketing emails.
- Select All Emails: Click the checkbox in the toolbar to select visible emails, then click the blue notification to select all conversations in that category.
- Delete Emails: Click the trash icon and confirm the action to move the emails to Trash.
This method is ideal for clearing out promotional or social media emails without affecting your primary inbox. Be sure to empty the Trash folder afterward to reclaim storage space. Regularly managing categories can prevent your inbox from becoming cluttered again in the future.
Method 3: Delete Emails by Label
If you use labels to organize your emails, you can delete all emails under a specific label with ease. Follow these steps:
- Navigate to Labels: Scroll to the bottom of the left sidebar and click “Labels” to view your custom labels.
- Select a Label: Click the label you want to clear, such as “Work” or “Newsletters.”
- Select All Emails: Use the toolbar checkbox to select visible emails, then click the blue notification to select all conversations in the label.
- Delete Emails: Click the trash icon and confirm to move the emails to Trash.
Labels are a powerful way to organize emails, and this method allows you to target specific groups without affecting others. For example, you can delete all emails labeled “Spam” or “Old Projects” to streamline your inbox efficiently.
Method 4: Delete Emails by Sender
Want to remove all emails from a specific sender, such as a retailer or subscription service? Gmail’s search filters make this process simple:
- Open Search Options: Click the search bar at the top of Gmail and select the filter icon to open search options.
- Enter Sender’s Email: In the “From” field, type the email address of the sender whose emails you want to delete (e.g., [email protected]).
- Search and Select: Click “Search” to display all emails from that sender, then use the toolbar checkbox and blue notification to select all matching conversations.
- Delete Emails: Click the trash icon and confirm to move the emails to Trash.
This method is perfect for eliminating repetitive emails from specific sources, such as newsletters or marketing campaigns. To prevent future emails from the same sender, consider unsubscribing or creating a filter to automatically delete their messages.
Method 5: Delete Emails by Date Range
To clear out emails from a specific time period, such as old messages from years ago, use Gmail’s date range filter:
- Access Search Filters: Click the search bar and select the filter icon to open search options.
- Specify Date Range: In the “Date within” field, enter the desired date range (e.g., 01/01/2020 to 12/31/2020) and click “Search.”
- Select and Delete: Use the toolbar checkbox and blue notification to select all emails within the date range, then click the trash icon to delete them.
This method is ideal for clearing out outdated emails, such as those from a specific project or time period, without affecting newer messages. Be cautious when selecting large date ranges, as this can include important emails—always review before deleting.
Method 6: Delete Emails by Size
Large emails with attachments can quickly consume your Gmail storage. To target these space-hogging messages:
- Open Search Filters: Click the search bar and select the filter icon to access advanced search options.
- Set Size Parameters: In the “Size” field, specify a size range (e.g., greater than 5MB) and select the unit (MB or KB) from the dropdown.
- Search and Delete: Click “Search” to display emails within the size range, then use the toolbar checkbox and blue notification to select and delete them.
This method is particularly useful for freeing up storage by targeting emails with large attachments, such as videos or high-resolution images. After deleting, empty the Trash folder to ensure the space is reclaimed immediately.
Method 7: Delete All Emails in Gmail
For a complete inbox reset, you can delete all emails in Gmail. Be cautious, as this action is irreversible once the Trash is emptied after 30 days. Here’s how:
- Access All Mail: In the left sidebar, click “More” and select “All Mail” to view every email in your account.
- Select All Emails: Click the toolbar checkbox, then click the blue notification to select all conversations in “All Mail.”
- Delete Emails: Click the trash icon and confirm to move all emails to Trash.
- Empty Trash: Navigate to the Trash folder and click “Empty Trash now” to permanently delete all emails.
This method is a last resort for users with severely cluttered inboxes. Before proceeding, ensure you’ve backed up any important emails, as permanent deletion cannot be undone after the 30-day Trash period.
Recovering Deleted Emails
Accidentally deleted important emails? Gmail keeps deleted emails in the Trash folder for 30 days, allowing recovery:
- Go to Trash: In the left sidebar, click “Trash” to view deleted emails.
- Select Emails: Check the boxes next to the emails you want to recover.
- Restore Emails: Click the “Move to” icon and select “Inbox” or another folder to restore the emails.
Act quickly to recover emails, as they are permanently deleted after 30 days in the Trash. Regularly checking the Trash folder can prevent accidental loss of important messages.
Tips for Preventing Inbox Clutter
To keep your Gmail inbox manageable in the long term, consider these proactive strategies:
- Unsubscribe from Newsletters: Use the “Unsubscribe” link at the bottom of promotional emails to reduce incoming messages.
- Create Filters: Set up filters to automatically delete or archive emails from specific senders or with certain keywords.
- Use Labels Wisely: Organize important emails with labels to keep your inbox focused on priority messages.
- Regularly Empty Trash: Clear the Trash folder periodically to free up storage and prevent buildup.
- Archive Instead of Delete: For emails you might need later, use the “Archive” option to remove them from the inbox without deleting.
By adopting these habits, you can maintain a clean and organized inbox, reducing the need for frequent bulk deletions. A well-managed Gmail account enhances productivity and ensures you never miss critical communications.
Final Thoughts on Gmail Inbox Management
Deleting emails in bulk in Gmail is a powerful way to reclaim control over a cluttered inbox and free up valuable storage space. Whether you’re clearing out specific categories, targeting emails by sender, or wiping your entire inbox, Gmail’s tools make the process efficient and user-friendly. By following the methods outlined in this 2025 guide, you can transform your inbox from a digital black hole into a streamlined, organized space.
Start implementing these techniques today to enjoy a clutter-free Gmail experience. With regular maintenance and smart email management practices, you can keep your inbox in check and focus on what matters most. Take charge of your Gmail account now and experience the freedom of a clean, efficient inbox in 2025.